Sunday, December 6, 2009

Apple Pie with Crumble Topping


So, Thanksgiving has passed and Christmas is approaching quickly. When I think of the fall holidays, I think Apple Pie! I am not a huge fan of pie in general... but Apple Pie is a different story. This is my favorite apple pie recipe and I hope it will be one of yours too!
When making the filling, I like to use a combination of different kinds of apples. I usually use 3 Gala and 3 Jonathan apples. These apples are firm enough that they don't get mushy when you cook them, but they are tangy enough to stand up to the sweetness of the filling.


When it comes to the crust. If you have a really great crust recipe, by all means use it. I, however, like the Pillsbury pre-made pie crusts. They are so quick and easy and they taste great! Grease your pie plate and lay your crust inside. After mixing the filling, plop it inside the crust, and top it with the

For the filling:
6 apples cored, peeled and sliced
1/2 cup sugar
1 tsp. cinimon

For the topping:
1/2 cup sugar
3/4 cup flour
1 stick butter

Preheat the oven to 400 degrees. Bake at this temperature for 7 minutes then turn the temperature down to 350 and continue to bake for another 35-45 minutes until golden brown and the juices are bubbling.

Saturday, November 21, 2009

PeanutButter-ChocolateChip-BananaBread-Muffins


I am a person that likes my bananas with a little green on top. As soon as they go all yellow and start getting little brown spots on them... eh.... not so much. I hate it when the strings on the inside of the peels stick to the fruit when you peel it... NO THANK YOU! Since I am a little picky about my bananas, periodically I will throw a banana, which is too far gone for my taste, in the freezer. Once I have accumulated a few I make banana bread!

Key:
3= not quite 4= perfect 5= still pretty good 6= edible--losing interest 6.5 (not shown)= freezer time 7= NO WAY--might as well be moldy in my opinion!


Now... since I don't really like the over-ripe banana flavor that comes with those brown spotted bananas that means that I don't usually like banana bread with TONS of over-ripe banana flavor, either. What to do... what to do... ? Lets mask the flavor with something else: peanut butter and chocolate!

Don't get me wrong. It is still banana bread. You can still taste the banana, but who doesn't love peanut butter on a banana? or bananas dipped in chocolate? or the great combo of chocolate peanut butter cups? Basically I am telling you, if you are anything like me, this is THE BEST banana bread you will ever taste.

What You'll Need:
2 cups all-purpose flour
1 1/2 tsp. baking powder
1/2 tsp. baking soda
~1/2 tsp. salt (i use the palm of my hand)
1 tsp. cinnamon
tiny pinch nutmeg
2-3 ripe bananas (2 large or 3 smaller)
1/2 cup creamy peanut butter
3 Tbl. applesauce (normally calls for butter, but I like applesauce in this recipe!)
1/2 cup granulated sugar
1/2 cup packed light brown sugar
2 eggs
2 tsp. vanilla
1/2 cup milk
3/4 cup chocolate chips (whatever kind you have, but semi-sweet is my least favorite...stick to either milk chocolate or dark chocolate for best results)

Prepare the "wet ingredients" by mushing your bananas and peanut butter together with fork. Once mashed stir in the applesauce and sugar before adding the eggs, one at a time. Follow with addition of the vanilla extract and the milk. Add your combination of dry ingredients but don't over-mix. Just stir until incorporated! Fold in the chocolate chips and pour into muffin tins or loaf pan for baking. Makes 18 muffins or one large loaf!

One of my roommates is not a huge chocolate lover so I made some of the muffins without chocolate for her. Still yummy. So that is definitely an option if that is your cup of tea... but I never turn down chocolate!

Tips:
1. Use a spatula or spoon to stir and mix the batter... if you use an electric mixer it gets over-mixed and the muffins can turn out spongy and chewy
2. Normally, I am a big fan of rounding up on the chocolate chips but in this case if you round the chocolate over-powers and you just get chocolate chip muffins. Although still tasty, not the intended target here!

For Muffins: cook at 350 degrees for 25-35 minutes
For Loaf: cook at 350 degrees for 45-55 minutes

Some people might wait for the muffins to cool...using this phenomenon known as delayed gratitude... I am not one of those people.

I would rather burn my fingers and mouth on piping hot muffins fresh out of the oven when the chocolate chips are still warm and melty. I think this is partially why I prefer these as muffins rather than a loaf... loaf you have to wait a while before you can cut it. Not my style!

Sunday, November 15, 2009

Indian Summer Sangria


Here in the mid-west we are having a bit of an indian summer! It's November and we've had weather in the 60s and 70s. On a nice weekend Sangria is a great refreshing drink. This was a really easy recipe and it was unmistakably delicious!

What you'll need:

2 bottles red wine (any kind you like I used a blend an a Malbec)
2 oranges
2 lemons
2 limes
1 cup strawberries and raspberries
1 cup pineapple
large splash of orange juice (up to but no more than 1/4 cup)
4 shots liqueur of your choice (I used elderberry liqueur)
4 Tbl. Sugar
8 cups gingerale (add right before serving)

Cut the fruit up into wedges or slices, sqeueeze the juice and throw in the fruit liqueur, juice and sugar and let it sit overnight in the refrigerator to infuse all of the flavor. Add the gingerale just before serving!

Friday, October 23, 2009

Savory Balsamic Glazed Plums


Fall is officially here and with that comes plums! I thing plums are great but, for me, it has to be the right time of year... and October is the beginning of perfect plum season!

In addition to seasonal ingredients, I am a student with little free time. I love finding ways to spruce up left overs for a quick, yet delicious, dinner. This time the inspiration was left over pork loin and fresh plums.

I cut up the plums and saute them in a couple of tablespoons of some white wine, balsamic vinegar, brown sugar, cinnamon and nutmeg. As soon as they get soft and the glaze starts to thicken and coat the plums.

approximate measurements:
white wine 2 Tbl.
balsamic vinegar ~3 Tbl.
2 sliced plums
brown sugar ~1Tbl.
cinnamon, to taste, and a tiny bit of nutmeg

Pork and plums are a great combination. I used a pre-marinated, lemon herb, pork tenderloin and roasted it in the oven. These tenderloins are so easy and great the next day as left overs for sandwiches or something like this warmed up with fruit on top.

Wednesday, October 21, 2009

Delicious Fresh Green Beans

Summer is officially over, but I did get some good fresh green beans from the farmers market before the cold weather set in. Fresh green beans are so much better than canned you really cannot compare them to fresh at all. With fresh green beans I like the simple approach. Blanch and Saute.

Snap the ends off of the green beans and rinse them. Boil and salt some water. When the water boils, blanch the green beans for 4-6 minutes (depending on how thick and crispy they are). After taking them out shock them immediately by dropping them into a bowl of ice water for another 4-6 minutes to stop the cooking. You want the beans to be in the ice water about the same length of time as the boiling water.

Melt some butter and olive oil in a saute pan and saute the blanched green beans with the butter and olive oil for a few minutes. Season simply... I like them with salt, pepper, garlic powder and onion powder. Sprinkle some freshly graded Parmesan cheese over the top. There is no better, and simpler way to eat fresh green beans... I promise. Even my sister (who hates green veggies) will scarf these down!

Wednesday, September 2, 2009

Heaven on a Plate


This dessert has given me a very hard time while I was trying to come up with a name or any kind of short description for it. This dish is kind of a combination between a coffee cake, gooey butter cake, and a sophisticated, elegant dessert! Although the name I gave does not exactly explain what it is, it most certainly explains the absolute decadence of this invention!

Well since I don't have a better description at this time, I'll just start with how I made it! Originally this recipe was supposed to be some sort of Paula Dean orange flavored brownie, but my version resembles that in no way, shape, or form....don't lose faith yet...Here it goes!

Almond White Chocolate Blondie's with Cream Cheese Icing (best name so far):

For the Cake:
1 1/2 cups all-purpose flour
2 cups granulated sugar
1 teaspoon salt
1 cup (2 sticks) butter, softened
4 eggs
2 teaspoons pure almond extract
1 teaspoon vanilla
1 cup white chocolate chips

Beat together the butter and sugar. Add the dry ingredients then mix in the eggs 1 at a time. When it comes together stir in the vanilla and almond extract with a spatula. Stir in the white chocolate chips.

I have heard that if you coat the chocolate chips with flour it helps them stay suspended in the cake... DO NOT DO THIS ON THIS RECIPE! The best part about this invention is that when you bake it the white chocolate chips sink to the bottom forming a crispy white chocolate crust! Believe me, you don't want to miss out on that!

Pour the batter in a greased 9x13 inch pan and bake at 325 for approximately 45 min or until golden brown and toothpick comes out clean... Don't overcook! You want the toothpick to come clean, but just barely! It will fall when cooling...don't fret, falling leaves it and moist.

While the cake is baking whip up the irresistible almond flavored cream cheese icing.

For the Frosting:
8 oz cream cheese
4 tablespoon butter
1 lb. powdered sugar (about 2 1/2 cups)
milk to thin (1-2 tablespoons)
1/4 teaspoon almond extract

 As soon as the cake comes out of the oven poke lots of little holes in it using your toothpick and spread a thin layer of the cream cheese icing over the top. The icing will melt down into the cake to help make it even more flavorful and moist! Once it cools, add more icing on top!

This cream cheese icing is great but the recipe makes way more than necessary. You could probably cut it in half if you wanted to.... but who doesn't love a little extra cream cheese icing hanging around in the fridge to dip gram crackers, Nilla wafers, or fingers?!

I was hoping that by the end of writing this I would come up with a better name for this dish, but the perfect description still eludes me. Since I don't have a great explanation of the dessert I would love for you to try it out and let me know what you think I should call it! When I made it for my family, we at it as a dessert, and as breakfast with coffee so it can be a multifaceted recipe!

I also want to say: I promise that I really do eat much more healthily than my blog is so far leading you all to believe with all of these baked goods and desserts! However, I did have a disclaimer that my weaknesses were chocolate and cheese so not completely unwarranted! I promise more healthy recipes to come!

Sunday, August 9, 2009

Frozen Key Lime Pie


As summer winds down to a close I MUST get this recipe out there before it gets to be chilly and fall. This frozen pie is not officially "key lime" as it is way to simple to be such and includes no such ingredient! It is simple, refreshing, tangy, and quite delicious! It always reminds me of summer and is one of my mother's few treats that always wins rave reviews! It's so simple and refreshing it's a must have at least once every year before the leaves start falling!

4 simple ingredients:
  • 1 can frozen limeade concentrate
  • 8 oz frozen whipped topping
  • 1 can sweetened condensed milk
  • pre-made chocolate oreo crust
  • 3 drops of green food coloring (not a true ingredient)
I promised simple and simple I will deliver: thaw the ingredients (if the whipped topping is not fully thawed it will not mix and it will be clumpy), mixing the limeade and sweetened condensed milk together with a spatula, and fold in the whipped cream. Pour into the pre-made crust, and after four short hours (or overnight) in the freezer... voila! Delish!

Tuesday, August 4, 2009

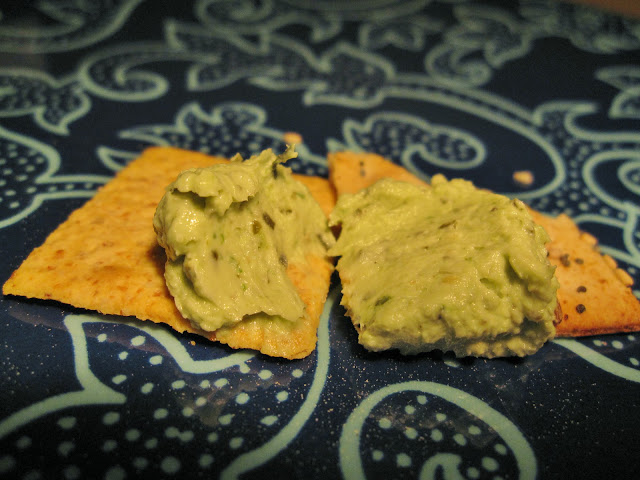
Easy Creamy Cheesy Pesto Spread


This is a recipe courtesy of my friend Emily's family friend, Veronica. In college Emily and I roomed together and Veronica was nice enough to send us a half-gallon container of this stuff every couple months. The tub usually only lasted a couple weeks! This stuff is as addictive as I imagine any drug could be (not that I would personally know)

So, after my recent blog about homemade pesto I couldn't resist making this delectable treat! It is SOOOOO easy and fast you wouldn't even believe it! Great on crackers (I prefer wheat thins) or sandwiches or raw veggies! I'm sure it would melt down nicely over hot noodles also to make a creamy cheesy pesto sauce.

I like making this with homemade pesto, but if you don't have any on hand or don't want to go to the trouble, it would be great with store bought pesto as well.

Four Simple Ingredients:
  • 2 oz Cream Cheese
  • 4 oz Goat Cheese
  • 1/4 c. Homemade Pesto
  • salt and pepper to taste
All you do... mix your pesto, cream cheese, and goat cheese together in a bowl with a spoon or spatula until it is all blended and smooth. Season it with salt and pepper to taste, and devour!!!

Tuesday, July 28, 2009

Basil Walnut Pesto


This Pesto is so easy and so quick in the summer time. When you have fresh basil, I cannot think of anything better to do then to make homemade pesto!


I like adding walnuts in addition to the traditional pine nuts because I think it adds an extra layer to the depth of flavor!


1/3 c. walnuts
1/3 c. pine nuts
1 head of garlic (~9 cloves)
1 c. freshly graded Parmesan cheese
3 bunches fresh basil leaves (~5 c.)
olive oil (I used about 1 1/2 c.)
salt and pepper to taste

So basically all you do is put it all in the blender, and chop it up... order probably wouldn't mater, although I would recommend the nuts and garlic first, then adding the basil and cheese, and adding enough olive oil to make it into a thick paste. You can always add more oil later, so don't add too much in the beginning. If its a paste you can use it more as a spread too! If you're using it for pasta sauce you can always add a little starchy pasta water or some more oil to thin it out a bit...but don't make it too runny!

I accidentally added the blender attachment blades to my little "rocket" blender instead of the food processor one... so that is why the pesto looks a little more smooth than normal... but I promise, it tastes delicious!

Friday, July 24, 2009

A Berry Peachy Breakfast (or dessert)


I am not a huge breakfast eater on most days, I like the grab and go method with granola bars and morning coffee. Don't get me wrong, when my mom makes waffles and my dad fries up bacon and sausage with scrambled eggs I will eat until my heart's content. However, that is not the typical day for me.

I have gotten tired of the boring chewy granola bars every morning ...and in the summer, especially, I love fresh fruit. These raspberry, blackberry, peach breakfast bars were a great combo of fresh summer berries and peaches with the easy "grab and go" method I spoke of before!

These would also make a great dessert! You could serve it warm with some vanilla or cinimon flavored ice cream on top... almost like a makeshift apple crisp or fruit tart. (They also make a great afternoon snack)

Berry-Peach Breakfast Bars

Crust and Crumble Topping

1 c. flour
3/4 c. brown sugar
dash of salt
1 stick of butter (room temp and soft, but not melted)
2 1/2 c. oats
splash of orange juice (~2 Tbl.)
drizzle of honey for the top


Fruit Filling
3/4 c. brown sugar
1 Tbl. white granulated sugar
2 Tbl. flour
4 1/2 cups fresh berries or other fruit
splash of lemon juice (about a tablespoon)


To mix the crust and topping add the flour, brown sugar, and salt to the butter and mash with fork until small crumbs form. Combine with the oats and mix until incorporated. Set aside about 1/4 of the mixture to use as the topping. To the crust portion, add the splash of orange juice (apple juice or other flavors work as well... I used orange mango peach) just to moisten.

Now it's time to get your hands dirty! Combine and press down into the bottom of a greased 9x13 inch pan... I recommend using the fingers. Some people might opt for the bottom of a measuring cup... but the mess makes it more fun, and tasty!

For the filling, mix together all of the ingredients and stir so that fruit is coated with the mixture. You can use whatever kind of fruit combination you would like... I used raspberries, blackberries and peaches! Depending on your preference you can leave the berries whole or cut them into smaller chunks. I cut the peaches into cubes but you could cut and leave them in thin slices if you prefer... all up to you! Pour the fruit filling on top of the crust so the fruit is evenly spread in one layer.

Take the crumb topping you set aside earlier and crumble over the top of the filling! Bake the dish at 375 for 30 minutes. When the time is up take it out and drizzle some honey over the top. Little-bitty thin strings of honey over the topping adds a little extra natural sweetness! Back in the oven for 5 more minutes, or until the top is golden and crispy!


If you intend to eat these for breakfast, allow them to cool for a couple of hours and then cut them into squares and store them in some tupperware in the refrigerator.

If, however, you intend to eat these for dessert, let them cool for only a few minutes, cut them and serve them warm with ice cream over the top... depending on the type of fruit you used, there could be many different flavors of ice cream... but if in doubt, you can't go wrong with plain old, classic vanilla!


Monday, July 20, 2009

Carol Brownies


These brownies are my all time favorites! My aunt, Carol (whom I'm named after), used to make them all of the time, and when I was young she taught me the recipe and her technique. I don't think I appreciated the simplicity of the recipe until much later down the road, but the fact that you only need one bowl, one measuring cup, and a few ingredients that I always have on hand!

These brownies only take about 5 minutes to put together...easy and fast!


Carol Brownies:
1 c. sugar
1/2 c. flour
2 eggs
1 1/2 squares Unsweetened baking chocolate
1 stick butter
1 tsp vanilla (2 tsp is better!)


Melt the butter and chocolate in the microwave (or stove, but microwave is easier) just until all of the butter is melted. With a spatula stir the chocolate butter mixture until the chocolate is completely dissolved in the butter. If you heat the mixture too long to try and melt all of the chocolate, the butter will burn. Just melt the butter and use the residual heat to melt the chocolate completely. When you finish the mixture will be a silky chocolate liquid! A great beginning to any dessert.


After the mixture is completely melted stir in the sugar, followed by the flour so you have a thick chocolate mixture in your bowl. Next follow by the addition of one egg at a time. Stir in completely. Stir in the vanilla until completely incorporated and pour into a 9x9 inch pan.

Bake the brownies at 325 for 20-30 min. On my oven, 22 minutes is perfect!

If you must...you can add pecans to these. I like nut-less brownies because I can focus on the chocolaty deliciousness more that way without interruption... but i completely understand if you feel the desire to add some nuts. However, the first time, I would try at least half the pan nut-free to give them a fair shot!

Once the batter is in the oven, lick the bowl clean using spoon, spatula, fingers, tongue... any means of getting every last drop!

I have been known to eat the entire bowl of batter with a spoon (regretting it later)... If you are going to take the spoon method, I would recommend baking and then, if desired, take the spoon to the warm brownies before they completely set. Most likely you wont eat the entire batch this way, and then once they cool a bit more you still have some great brownies to eat the next few days (if they last that long...)

I usually double the recipe if my family is around because a single batch wont last more than a day... a double batch usually lasts about two.


Note: Do not ruin these brownies by using an electric mixer... my mom tried that once and took away all possible fudgy, moist properties these brownies had...

Monday, July 6, 2009

Chocolate Madness Cashew Cookies


I LOVE chocolate! Since I don't always have a ton just lying around (because i have eaten it all) I have to get creative as to what form I should make my chocolate. I also like adapting recipes and trying to improve upon them when baking to make things more interesting. This cookie was a combination of boredom, chocolate needing, and recipe searching!

I found a very generic recipe for chocolate cookies using cocoa. Looked at what I had around the apartment... low and behold.... chocolate liqueur! I had previously made an alcoholic chocolate cake for a friends 21st birthday with a raspberry rum glaze, chocolate liqueur icing, and a Bailey's cream cheese filling (it was delicious, but that's for another day).

So I decided to try and adapt to make some rich chocolaty cookies. I also found some cashews and figured those would work in nicely! I think almonds macadamia would work better in the future though. Don't get me wrong, the cashews were great, but I love cashews so much on their own, it didn't to the nut justice in such a fantastic, rich cookie!

As you might remember, I don't measure things often, so I used this basic recipe and made the following additions:

Basic Chocolate Cookie:
  • 1 c. Butter
  • 1 1/2 c. Sugar
  • 2 Eggs
  • 1 t. Vanilla
  • 2 c. Flour
  • 1/2 t. Baking Soda
  • 1/2 t. Salt
  • 2/3 c. Cocoa Powder
My additions:
  • 1/2 t. Baking Soda
  • 2 T. Chocolate Liqueur (I used Godiva)
  • 1 T. Irish Cream Liqueur (such as Baileys)
  • 2 c. White Chocolate Chips
  • 1 C. Cashews (roughly chopped)

In case that was confusing....

Overall Chocolate Madness Cashew Cookie:
  • 1 c. Butter
  • 1 1/2 c. Sugar
  • 2 Eggs
  • 1 t. Vanilla
  • 2 c. Flour
  • 1 t. Baking Soda
  • 1/2 t. Salt
  • 2/3 c. Cocoa Powder
  • 3 T. Chocolate Liqueur (I used Godiva)
  • 1 T. Irish Cream Liqueur (such as Baileys)
  • 2 c. White Chocolate Chunks
  • 1 C. Cashews (roughly chopped)
Refrigerate the dough for a couple hours before baking the cookies! Bake these cookies at 350 for 10-14 minutes.

These cookies would definitely be great with Dark Chocolate Chunks, Walnuts, Macadamia Nuts... the possibilities are endless to a delicious chocolate cookie!

If you're a person who (like me) normally rounds up on the salt in recipes because you love the salty-sweet combo... don't do it in this if you're using both salted butter and salted cashews. If they are unsalted nuts, however, you probably will need a little extra salt because the liqueur makes the dough really sweet!

I made these cookies just like I would any other! Cream butter and sugar, add eggs one at a time, mix dry ingredients, add slowly to the wet, fold in nuts and chips.... dollop and bake!

My cookies were fudgy because I didn't use a mixer (out of laziness) but they ended up great anyway! If you want fluffier cookies rather than fudgy, sift the flower mixture and then beat in the flour mixture vigorously with the mixer after each addition.

WARNING: WTHESE COOKIES ARE YUMMY AND DELICIOUS AND SHOULD NOT BE MADE IF YOU ARE ON A DIET, BECAUSE YOU WILL EAT THEM ALL.

Saturday, June 27, 2009

Basil Lover's Lunch


Basil, Basil, Basil. Who doesn't love basil? I got some fresh basil and honey wheat bread at the farmers market and put those into one of the best sandwiches that I've ever eaten!

Sandwiches are so easy, and quick, and the options and variety are unlimited! Other than the basil and bread that I got at the market, I just looked through the refrigerator to see what I had (and as a college student, in the summer, sometimes the options are limited)!

The combination of flavors that I was able to scrounge up was pretty great, though! I found a great, nutty pesto sauce that I had made a few weeks prior and had in the refrigerator! I slathered one side of the bread with some of the garlicky, nutty, basily pesto sauce, smells great already!


Munster cheese is one of my favorites for sandwiches, and turkey is my all time favorite sandwich meat, so its no surprise that those were two of the things I scrounged up.

Sliced some apple to add some sweetness and layered some basil leaves on top... smoked turkey gives the last essential ingredient!

...and a sandwich like this gets exponentially better when grilled panini style! The Foreman grill works great if you don't have a panini griller, but the classic skillet will work as well.

When finished, this sandwich was pretty close to perfect. The apple was sweet, and crunchy, the pesto gave a nice, moist garlic and basil flavor, the melted cheese adds a little tang and blends the flavors together. And when you get a bite of the fresh basil with the sweet toasted bread and the savory turkey...perfection.