Friday, July 26, 2013

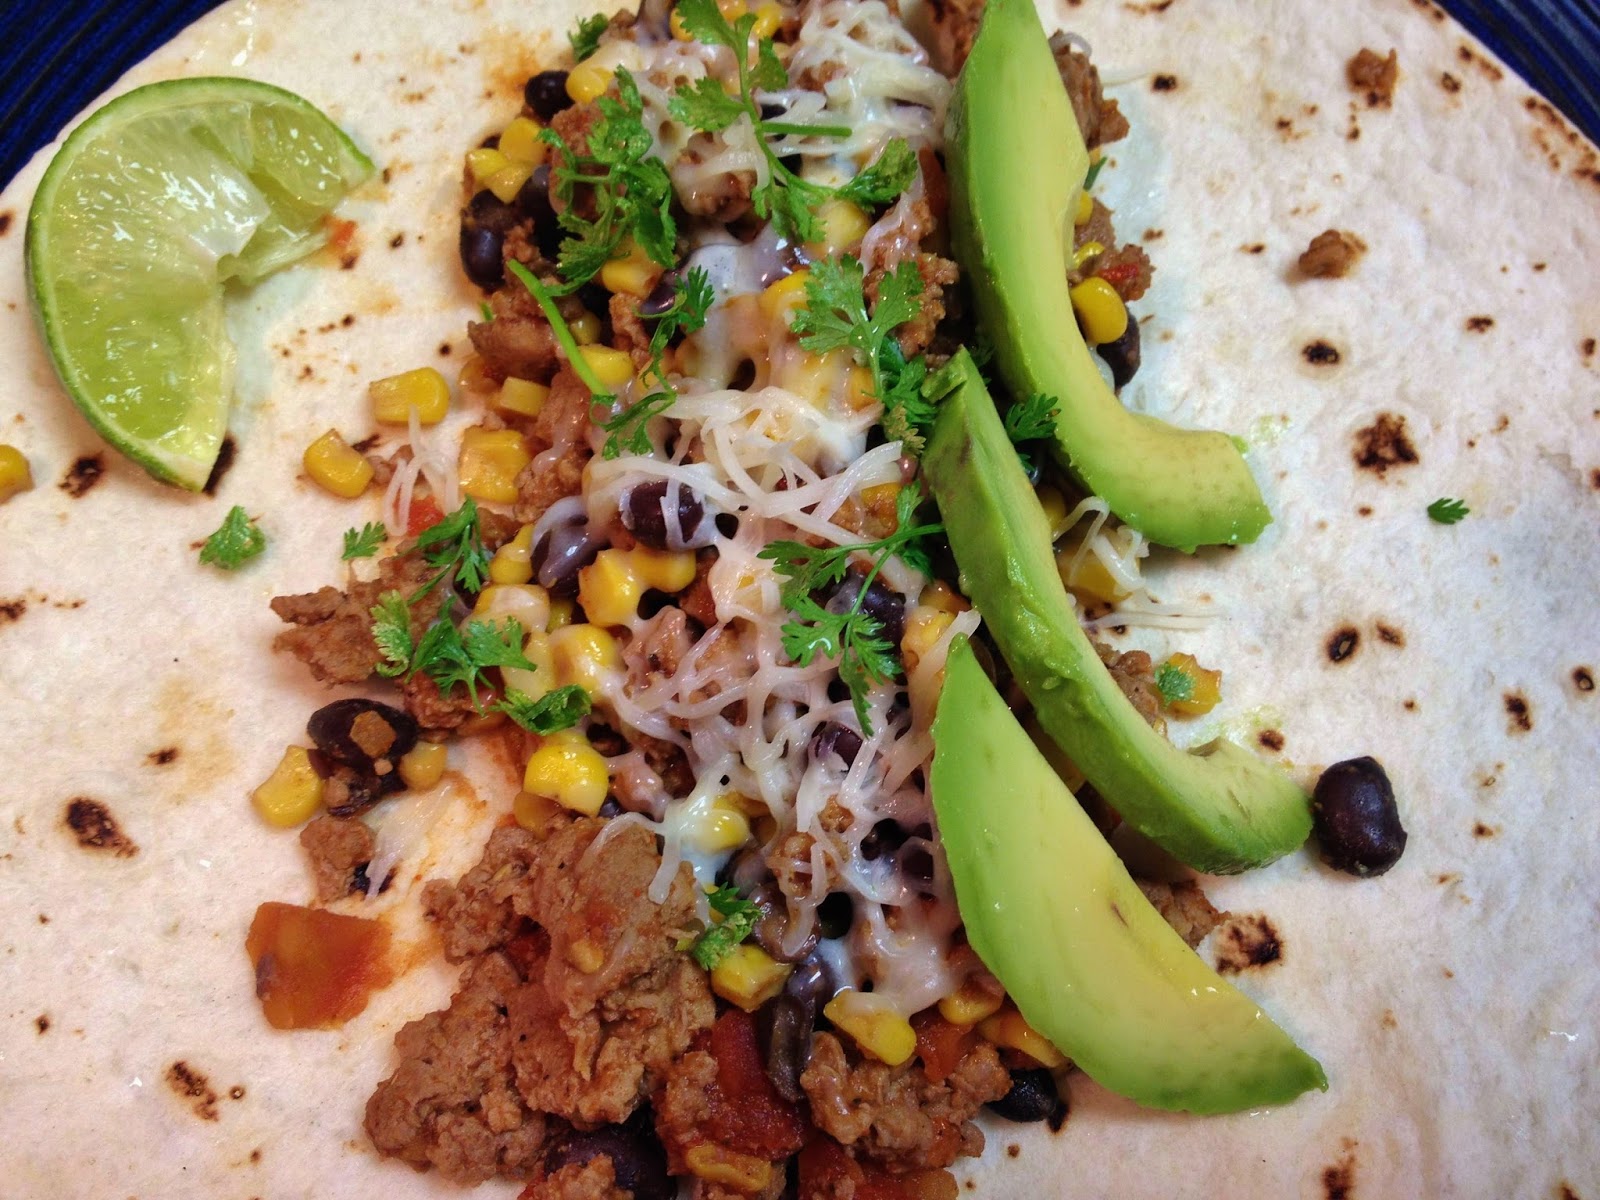
Southwest Tacos: 15 minutes, 5 ingredients


Even though I really enjoy cooking, sometimes when I come home after a long day at the hospital, I really don't want to spend a lot of time cooking and then have to clean up all the dishes. Also, when I get home from the hospital I am usually STARVING!

 This dinner is nice because it's quick, only dirties one pan, and makes plenty of leftovers! The other nice thing is even when I haven't been to the grocery store in a while, I usually have all of this stuff on hand. Enjoy.

Gather up the stuff:
1 pound ground meat (turkey, chicken, beef)
1.5 Tbl. taco seasoning
1 can corn (rinsed)
1 can black beans (rinsed)
1 cup salsa

Saute the meat and taco seasoning together add in the beans, corn, and salsa and warm it up and... Ta-Dah...you're done! Add on some cheese and tortillas and it is good to go.

I just happened to have some fresh lime and avocado around and I used some cilantro from my herb garden, but I've made this tons of times without the fresh ingredients and it is still really delicious.

This warms up well left-over, too. It actually makes really good nachos! They are also pretty low-cal, especially if you don't use beef. Use plain Greek yogurt instead of sour cream to cut down on extra calories also.

One batch of this will feed Ben and me for at least 2 dinners and 2 lunches.


Saturday, May 25, 2013

Ben's Banana Burrito


In 2nd grade we had to memorize a poem and recite it for the class. This was mine:

BANANANANANANA, by William Cole. 

I thought I'd win the spelling bee 
And get right to the top
But when I started spelling Banana
I didn't know when to stop. 

I know that is a random tangent to start with, but anytime I type out the word "Banana" I think of this poem and it makes me smile.

To get to the point, I like bananas, but I like them a whole lot more when they are paired with probably the best food ever created NUTELLA!!! Ben think's I am crazy for how much I love nutella because I"ll just eat spoonfulls of it sitting on the couch or while studying. What can I say, it's delicious.

Anyway, Ben makes really good breakfast and even though this one is super simple it is sooo good! Melty and warm on the inside but crispy on the outside!

He just spreads the peanut butter or Nutella (using both is the best) on the inside with the sliced banana and wraps it up. Then he toasts it in a hot, dry pan to brown the outside and warm up the inside so it is all gooey and crispy.


Really simple, execution is super easy, but it is the genius idea that counts!

Sunday, September 23, 2012

Homemade Roasted Tomato Sauce


This is one of my favorite things to cook, period. But for those of you who need a specific recipe... sorry, I don't have one. This sauce is the epitome of my "taste as you go cooking." Here in this post today, I wrote roughly what I would usually do for a basic tomato herb sauce.

Like I said, this is the basic tomato sauce, but I like to mix it up depending on the day and what veggies I have around. It is really fun to get creative and add in some roasted red peppers or mushrooms when you have those available!

This sauce is quick and great on noodles for an easy dinner with a side salad. BUT this sauce has great flavor and picks up other flavors really well. I love using this sauce on grilled chicken with a slice of melted cheese...almost like chicken parmesan except faster, easier, and without the extra mess or extra calories of breading and frying the chicken. It freezes and thaws great, too.

When I first started making this in college I was only cooking for myself. I would make a whole batch of it, and freeze it in little mason jars or Tupperware. The stuff thaws well and tastes great up to 6 months later (probably longer, just never makes it that long before I eat it all)! I've used it on eggplant Parmesan, too, and it was a huge hit with my boyfriend's family.

I've thought too about making it into a base of a tomato or roasted red pepper soup... I'll have to let you know if that works out. Let me know if you try it first and tips for success!

Basic ingredient list:
  • 2 Pints Cherry Tomatoes
  • 1/2 White or Yellow Onion
  • Garlic (~5 cloves)
  • Fresh Herbs of Choice (basil, rosemary, thyme and oregano are all good) 
    • If you don't have fresh herbs around, you can also use dried  italian seasoning or herbs de Provence
  • Red pepper flakes (just a pinch)
  • Red wine (~1/4 cup drizzled)
    • Balsamic vinegar  (a little drizzle maybe a tablespoon or two)
    • I usually do EITHER red wine OR balsamic... could do both I guess, just may be a little acidic
  • Salt and Fresh Cracked Black Pepper
  • Olive Oil
  • Parmesan Cheese
Here's how it goes:
  1. Rinse and dump: the cherry tomatoes into roasting pan or cookie sheet. Just make sure it has a little edge at least so things don't roll away into the bottom of your oven
  2. Chop and dump: roughly chop your onion, smash the garlic cloves (don't need to chop), and chop fresh herbs and throw them all into your pan. If you're going to add red peppers or mushrooms or anything else at this point, just rough chop and throw it all in!
  3. Drizzle and shake: drizzle some olive oil, red wine or balsamic vinegar, salt and pepper, and shake it all around to coat them a little
  4. Roast in oven and do something else for a while: I usually roast them for ~30-45 min at 350 degrees. Just till the veggies are tender and the tomatoes are popping open
  5. Blend it and Taste it: This is where I get to use my little rocket blender, or my boyfriends mom's awesome ninja blender... anything with blades and buttons will work. Pour all the stuff from the pan into the blender including all the juice. Blend it all up and add olive oil until it's the right consistency for you. I usually blend in some freshly graded Parmesan cheese at this point. Taste it and add whatever else you want. 
  6. EAT IT
    1. Need ideas: noodles, chicken, baked tilapia or other white fish, roasted vegetables, spaghetti squash, dipping sauce for appetizers, eggplant Parmesan, with a spoon. 

Really simple, really quick, really delicious.

Let me know what yummy combinations you've come up with!

Sunday, July 1, 2012

Flank Steak with Chimichurri


I have always been intrigued by Chimichurri. It was this, supposedly, magical Argentinian sauce I had always heard of, but never tried. From what the ingredients were, I knew I would probably love it... but until a couple of years ago I had never tasted the stuff!

Then, within a short amount of time, I tasted about 3 different versions... and, while they were good, they tasted totally different! It was mind blowing. I thought it was supposed to be this classic dish, so I figured they would all be fairly similar. Wrong. Some were way more parsley-y, others with much more cilantro, and one was more of a vinegar based liquid with little fresh herb to speak of. I like the cilantro kind the best, myself!

For those of you who are unfamiliar with Chimichurri... it is an Argentinian sauce used on grilled meats.  It is usually made out of lots of fresh herbs (parsley, oregano, and cilantro) and is often bright green, in my experience. That is the extent of my knowledge... sorry to disappoint

So, my secret is out... I'm by no means a Chimichurri expert. However, I wanted to come up with a recipe that I liked and could make with my fresh herbs in the summer time!

I took what I liked in different kinds that I've tried and made a combo of about 6 different recipes to come up with this... a pretty freaking fantastic Chimichurri, if you ask me! I won't be searching for recipes anymore... this one is a keeper. 

Flank Steak marinade
  • 1/4 c. vegetable oil
  • 2 Tbl. red wine vinegar
  • 2 Tbl. worcestershire sauce
  • 3 Tbl. brown sugar
  • 1 tsp. mustard (I used a spicy dijon)
  • 2 cloves garlic, minced
  • Salt and pepper steak immediately before grilling
Marinade the flank steak overnight (or if you don't have time, at least for a couple of hours). 

Preheat your grill to high heat. Take the steak out of the marinade and salt and pepper both sides right before grilling. For medium rare steak, grill about 5-7 min on each side. 

Take meat off the grill and cover with foil, to let it rest.


Chimichuri Sauce
  • 2 Tbl. fresh oregano
  • 1/2-2/3 c. chopped cilantro
  • 1/2-2/3 c. chopped parsley
  • 3 cloves minced garlic
  • 4 Tbl. fresh lemon juice (about half a lemon)
  • 1 minced shallot
  • 2 Tbl. red wine vinegar
  • 1/2 tsp. red pepper flake
  • 1 tsp cumin
  • 1/2 cup olive oil
  • salt to taste
Basically take all of the above ingredients, and blend them together until the consistency is like a sauce. Super easy... and REALLY YUMMY!!! Fresh light flavors great for summer grilling season and I got to use all fresh herbs from my garden!

Let me know how you like it!

Friday, April 20, 2012

Vegetarian Enchiladas (So good you won't miss the meat)

First off I want to say: Yes, I'm aware that these are not the most appetizing pictures. I didn't take them right away, this is a left-over enchilada after the microwave... and all I really wanted to do was eat it, so I didn't bother with getting good pictures. SO there it is. The cheesy blob of deliciousness that is the vegetarian enchilada!

This is another of the recipes I cooked for my PBL group in med school. I doubled this recipe and made about 23 enchiladas. This obviously tuned out to be way too many for 8 people, but they were great left over, and they were easy to make!

Now, Ben is a meat and potatoes kind of guy. I don't mean that he isn't adventurous (because he'll try anything), or that he doesn't like vegetables (he even likes broccoli... yuck), but... he does LOVE his meat. So I knew it was a big complement when he told me "These couldn't have been any better, even with meat in them."

Without further delay: Veggie Enchiladas

Enchilada Filling
  • ~ 2 cups cooked brown rice 
    • Usually a little less, I use the 5 minute instant brown rice and the servings work out so it's slightly less than 2 cups once cooked, which is perfect. I find 2 cups to be a little too much rice
  • 15 oz can black beans drained and rinsed
  • 1/2 white onion sliced up into strips or roughly chopped
  • One red pepper, one yellow pepper, one green pepper sliced into strips (not too long)
    • Some Grocery stores have the frozen pepper mix-about 16 oz bags work great for this! Less cutting for you!
  • Fresh Baby Spinach... I use about 1/2 a bag for a single recipe
  • 1 packet taco seasoning (~2 Tbl.)
  • 3/4 cup salsa
Saute the onion and peppers for a minute or two just to soften them, or defrost them if they are frozen. Mix the rice, peppers, onion, beans, salsa, and taco seasoning all together in a pot, or a pan with tall sides and stir together. Stir in the spinach and let it cook just until the spinach is barely wilted. Filling is done!

Fill your 6 inch flour tortillas with the filling and put in your baking dish. Usually fills about 12 tortillas of this size (maybe 10, I tend to over-fill my enchiladas)

Enchilada Sauce
  • 2 Tbl. vegetable oil
  • 2 Tbl. flour
  • 2 Tbl. chili powder
  • 1/2 tsp ground cumin
  • 8 oz can tomato sauce
  • 2 cups water
  • 1/3 tsp garlic powder (or to taste, if you like more)
  • Tiny little pinch cayenne pepper if you like a little heat-JUST  A LITTLE! You don't want to overpower the delicious filling
  • 1 tsp salt (or to taste)

I don't like canned enchilada sauce, and this is super easy so I use it. If you're cool with canned or you have your favorite brand of enchilada sauce, by all means go for it, if it saves a little time. But, really, this cooks up in just a few minutes while you're making the filling.

Just warm the vegetable oil over medium heat, add in the flour and chili powder to cook for a couple minutes (2-4 min). Add in all the other ingredients and stir well to mix it all. Bring it to a boil and then simmer over medium heat for about 10 min until it thickens up a little. It won't get very thick, but it's enchilada sauce, you don't want it super thick.

Once your filling is done and your enchiladas are all rolled up, pour the sauce over top. Top it with some cheese, I like the shredded white Mexican cheese blend. Bake at 350 for about 20 minutes until all warmed through, cheese is melty and sauce is bubbling!

They really are delicious, and super easy. Actually, I didn't even think about it till afterward, but they are pretty darn healthy too. Lots of veggies, very little fat (omit the cheese if you're REALLY worried... but, that just doesn't happen with me)!

Wednesday, April 4, 2012

Fish Tacos with Cilantro Lime Slaw


Simple weeknight dinner. Fish Tacos! So medical school is kind of busy. On top of that, It's my second year and I am preparing to take boards in just a little over a month. This mean that I don't really have a lot of extra time to make fun, new, time consuming recipes. This one is SOOOO simple and quick. It only takes as long as it takes to cook the fish. Assemble, scarf, back to studying (unfortunately)!

What you need (or at least what I use)
  • Frozen Parmesan Encrusted Tilapia
    • At Sams Club they sell big bags of frozen parm crusted tilapia... it's quick and relatively healthy so I usually always have it on hand. 
    • The parmesan crust in this adds a nice extra crunch almost like it's fried fish in the taco... without the extra deep fried calories (and mess)
  • Cole slaw/ shredded cabbage mix (from a bag)
  • Chopped fresh cilantro
  • Sliced fresh green onions
  • Lime juice (preferably from a real lime, not a hollow plastic lime)
All I do
  • Season with a little onion powder, chili powder, and cayenne (a little goes a long way)-bake according to directions
  • Mix together cole slaw mix, chopped fresh cilantro, sliced green onions, lime juice, and olive oil
    • For every half bag of cole slaw I use about a cup of cilantro, 4 green onions, the juice of half a lime, and a couple tablespoons olive oil
    • Do the lime juice first so the acid can coat everything, then drizzle a little olive oil to mix in, season with pepper if you want
    • It will taste pretty limey, but it's REALLY good on the tacos!
  • Once the fish is done, chunk it up with forks, put in in tacos with the slaw, cheese and your favorite fish taco sauce. 
    • Our favorite Mexican restaurant is right across the street so I use theirs, but if you don't have a go to fish taco sauce try this creamy jalapeno ranch sauce 
    • I'm also a big fan of home made guacamole or sliced avocado on these tacos!
  • Wrap everything up together in a nice warm flour tortilla! MMMM
If you don't have the parmesan crusted tilapia, or don't want that extra breading, baking non-breaded tilapia in a little lime juice with the same spices would work great! 

Wednesday, March 28, 2012

Tikka Masala


For those of you who know me, you know that I found out in October that I'm allergic to chicken and eggs. Yes, I know... they are (were) staples in my diet on a daily basis! SO it's been an interesting adjustment period.

One of the Cardiologists that lectured us, recently, reminded us that "the less legs it has, the better!" Obviously, since he is a cardiologist, many of his patients need to control their weight and cholesterol. He uses this method to help them figure out what they can eat! Pretty intuitive. The less legs it has, the better.

Maybe a visual aid would help:

Cows and pigs are worse than chickens which are worse than fish (mutant ones with legs don't count). And, obviously, vegetables can't grow legs so they are the best of all!

Some of you may also know that as a young child I had high cholesterol because I pretty much refused to eat anything except fried mozzarella and chicken strips. I had to see a dietitian and everything. From then on it was reduced fat wheat thins and fat free string cheese only!

So regrettably, I am informed enough to know that I can't just swap out my 10 meals a week that consisted of chicken for beef. This transition period to a meat-less; egg-less diet consisted of plenty of cheating and lots of whining, but I'm officially there and doing well... and eating a whole lot of turkey!


Anyway, if you're just looking for the recipe, here it is! This is a great recipe. I'll definitely be making it again! I'ts not near as difficult as it looks, just lots of spices. Marinade meat overnight, cut up veggies as you grill meat, mix all together, voila! 

Chicken (or Turkey in my case) Marinade
1 cup yogurt
1 Tbl. lemon juice
2 tsp. ground cumin
1 tsp. ground cinnamon
2 tsp. cayenne pepper
2 tsp freshly ground black pepper
1 Tbl. minced fresh ginger
2 tsp. salt
3 boneless chicken breasts (or same amount of turkey), cut into bite-sized pieces (about 12 oz meat, total)
4 long skewers for grilling

Needs to marinate for at least an hour, even better if it marinates over night,  so plan ahead a little bit!

Tikka Masala Sauce
2 Tbl. butter
4 cloves garlic, minced
4 tsp. ground cumin
4 tsp. paprika
2 tsp. salt 
16 oz. tomato sauce
14 oz can coconut milk (I used light)

Other stuff to put in the dish
1 red bell pepper coarsely chopped
1 large white onion coarsely chopped
1 or 2 jalapeno peppers, finely chopped (depending on your desire for spice)
1 small zucchini, sliced into, thin half circles
1 cup sliced carrots
1/4 cup chopped fresh cilantro

This dish can easily be made vegetarian by doing tofu with the chicken/turkey marinade! You could also omit the meat and just use more vegetables, although the meat marinade adds a lot of flavor.

What to do for the meat
  • In a large bowl, mix all marinade ingredients together. Stir in the turkey, cover, and refrigerate over night. 
  • Skewer the meat onto the wooden rods and grill over high heat for 4-5 min on each side
  • Set aside until ready to add it into the sauce
What to do for the Sauce
  • Melt butter in a large heavy skillet over medium heat
  • Saute the garlic, jalapeno, onion, pepper, and other vegetables for a couple minutes
  • Season with the cumin, paprika, and salt. 
  • Stir in the tomato sauce and coconut milk
  • Simmer on low heat until sauce thickens up a bit (15 minutes)
  • Add in the grilled turkey and simmer on low for another 15 minutes or so
    • The meat marinade actually adds a lot of flavor and spice, so don't add extra cayenne or anything until after you've mixed in the meat
  • With 5 min or so remaining, stir in a few tablespoons of fresh cilantro
Serve with white rice (I like jasmine rice) and top with more fresh cilantro!

Stop taking pictures and eat already!!!


Let me know how it works out for you. Also let me know if you have any egg-less breakfast casserole recipes!


Sunday, January 29, 2012

French Onion Soup


I remember the exact moment that I fell in love with french onion soup. I was 9 years old on vacation with my family to Hilton Head, South Carolina. It was a great trip, in general, we rode bikes along the beach, learned how to dig up conch shells, built racecars in the sand, and ate at some magnificent restaurants.

It was at one of these great restaurants where I discovered the best french onion soup, ever. If you ever get out that direction, Cafe at Wexford is fantastic, and the french onion soup is the one that won over my heart forever. Since then I have been comparing every french onion soup to that one. Most are good, many are great, and a few have come close to matching the perfection, but none just yet.

I have not given up on my quest to find one just as good as that first french onion soup. So recently I figured maybe I can make one that is just as good. I don't know that I'm quite there, yet, but either way this recipe is a keeper.

French Onion Soup
4 Tbl. Butter
1 Large Sweet Yellow Onion, thinly sliced
3 Large White Onions, thinly sliced
2 Cloves Garlic, minced
42 oz. Low Sodium Beef Broth
28 oz. Low Sodium Chicken Broth
1 cup Red Wine (approximate)
2-3 Tbl. Worcestershire Sauce
4 Sprigs Fresh Parsley
3 sprigs fresh thyme (+ another 2 Tbl. chopped)
1-2 bay leafs
2 Tbl. Balsamic Vinegar
Salt and Pepper to taste
Thickly sliced French Bread
Sliced Gruyere cheese for melting on top
Shredded Asiago cheese for melting on top

In a large pot melt the butter over medium heat. Stir in the thinly sliced onions and the garlic. Cook for 20-30 minutes, stirring often, until the onions are soft and caramelized. They almost start falling apart at this point (yum!).

Add in the beef and chicken broth, red wine, and worcestershire into the pot. I usually only add about half of the wine and Worcestershire now, because I like to add in some here and some there as I taste as I go. Allows me to get it just like I like it! Add in the bundle of parsley, bay leaf, and thyme sprigs, whole (you'll fish them out later). Simmer this over medium heat for about 20 min.

Remove the whole sprigs of herbs and add about another 2 Tbl. of fresh chopped thyme and stir in. Reduce the heat and add in the balsamic vinegar (usually only 1 Tbl. at a time, to see how the flavor is doing.) Now you can add salt and pepper to taste, also. A tip I learned the hard way: you never want to add salt until you are almost done cooking the soup. If you add it to your liking, and then continue cooking it down and reducing liquid off, it will end up much more concentrated and will taste a lot saltier than you anticipated.

Cut up your french bread and cheese (and eat a little for an appetizer!) Toast the french bread on both sides under a broiler, or in a toaster oven. Fill your oven safe bowls or crocks with hot soup, top with toasty bread, sliced Gruyere and Asiago cheese. Eeat any cheese that falls onto the counter, and place the bowls under the broiler until the top is melted, golden, bubbly, toasty, and perfect.

Devour immediately... but to avoid burning your tongue, I guess you should wait a minute before putting a huge cheesy chunk in your mouth. I'm not a patient person, though... so I burn my tongue nearly every time...WORTH IT!

Monday, January 23, 2012

Fluffy New York Style Cheesecake with Salted Caramel Sauce


In my medical School we do a PBL (problem based learning) curriculum. This means that we learn by going through real cases in small groups. Every 8 weeks, each student has to be "Quarterback" for one case, meaning that you lead the group. What this really means for me, is that I get a great excuse to make delicious unhealthy food that I can eat, and feed to other people (so I don't eat the entire cheesecake myself)!

Up until now, I had never made a cheesecake before. And considering it is one of my favorite desserts AND that I love to cook... that is pretty much just an atrocity! So I figured this was as good a time as any. I made a cheesecake for my group and it turned out AMAZING!!!!! OH MY GOSH BEST CHEESECAKE EVER!!!

I should preface, that I didn't pick a particularly easy cheesecake recipe, because I wanted it to be a great cheesecake. Go big or go home, right? So I didn't want one where you just mix together cream cheese and sugar and refrigerate it in a pre-made graham cracker crust. Don't get me wrong, those are still tasty, but I wanted to really do it right and make a real cheesecake.

I did run into my fair share of bumps in the road. Most of these were my fault, for not reading the recipe well  enough before I started making it, but I also had some bad luck tossed in there. For your amusement I have listed my mishaps in short:
  1. The original recipe was in metric units. Bleh! Yeah, I am a sciency person, so I understand metric and can convert stuff... but that doesn't mean I have any clue how many cups is equal to 273 grams of flour... SO I had to convert all of that a few times to make sure it was correct.
  2. The chocolate shortbread crust made WAY too much, so you were supposed to save half of it and toss out something like an additional fourth... something crazy. So I converted all of that into a normal amount of crust for one cheesecake. 
  3. I didn't read the cheesecake recipe well enough, almost put the eggs in whole, before realizing they needed to be separated. Also didn't realize I was supposed to use a giant roasting pan, which I don't own, until it was time to bake the cake. Don't stop here, crisis averted, just made do with what I had (instructions below).
  4. Worst of all: My mixer stopped working in the middle of whipping up the batter. You cannot make a cheesecake without a mixer!!! So I ended up having to go borrow a neighbors mixer at 10 PM, and re-paid them in left-over cheesecake!
However, many mishaps, crazy conversions, and one extremely messy kitchen later, the cheesecake was done. It was TOTALLY WORTH IT!!! 

Hopefully I have laid out the recipe well enough here with all of  my little tips that will help you not make the same mistakes I made. Let me know how it goes for you, and if you come up with any extra tips! One more time, in case you're intimidated by my crazy mistakes and mishaps.. it really is totally worth it, and it isn't a big scary recipe now that it's already converted and laid out step by step for you here, by yours truly!

Chocolate Shortbread Crust
  • 6 and 2/3 Tbl. Butter, cold cubed small 
  • 2 Tbl. Sugar
  • 2/3 cup + 4 Tbl. Flour
  • 4 tsp. Cocoa Powder
Preheat the oven to 350. Using a fork and your fingers, mix all the ingredients into a pebbly, sandy type  mixture. If you have a good food processor, this makes it even easier, but mine is a huge hassle to put together and clean, so I used a fork and fingers. Less fancy, worked great! Press the dough into the bottom of your 10 inch springform pan. Bake the dough for 35 min. Let it cool completely while you're mixing up your other stuff!

Cheesecake Batter
  • 2 pounds Cream Cheese, softened 
  • 1 stick Butter, softened
  • 1/4 cup Creme Fraiche or Sour Cream
  • 1 cup Sugar
  • 5 Eggs 
  • 3 Tbl. Flour
  • Zest of one Lemon
Notes before you start: 
  • I used half regular, and half reduced fat. By all means, feel free to use full fat!
  • Eggs will need to be separated into yolks and whites for this recipe (just a heads up, I didn't realize until I was ready to put them in... could have been a major SNAFU)
  • Don't get excited and try to start before the cream cheese and butter are fully softened, if you're tempted just set them both on the stove top while the crust bakes and walk away! It will get all lumpy, and you will have to clean your mixer out a bunch in a row... just wait. They will be soft soon enough.
  • Another place I was unprepared... this recipe calls to bake the cheesecake in a water bath in a big roasting pan. I don't have a big roasting pan (you know, the whole student thing, limited kitchen space, a roasting pan never seemed like something I really needed... whoops!). BUT I made it work, and it turned out great, so don't fear if you end up in this situation. You don't have to go buy a roasting pan! Just see my notes below for what I actually did. 
Once the butter and cream cheese are fully softened, cream these together and add the sugar, lemon zest, and sour cream. Mix these together until just combined. Sprinkle the flour over the mixture and mix in until combined. This is my first cheesecake to make, so I'm no expert, but I hear if you over-mix them they get lots of air in them and crack open in the middle when you bake them. So I made sure to just mix it until it was all combined and creamy.

Now you are ready for your separated eggs. Add in the egg yolks one at a time and combine with the creamy mixture. In a separate bowel whip the egg whites until stiff. Once stiff peaks have formed, fold the egg whites into the batter until it all comes together in a big fluffy batter!

Pour the batter in the springform pan, over your baked, cooled, crust. 

Wrap the bottom of your springform pan in aluminium foil to keep water out while you bake it in the water bath. If you have a large roasting pan, you will put the cheesecake in it and and add enough hot water to come halfway up the side of the pan. 

Here's where if you don't have a large roasting pan you can improvise like I did. I tested all my cake pans, and dishes to see if they were big enough. Of course they weren't. So I used a cookie sheet with edges to set the cheesecake down in and filled water up to the rim of the cookie sheet. This will at least keep the bottom from burning on the metal racks, and made sure it cooked evenly with the water. Then I took a big 9x13 cake pan and filled it with water and put it on the bottom rack, below the cheesecake, and this did a great job of helping to steam up the oven and cook it all evenly. 

I'm sure if you have a roasting pan that is slightly superior, but this cheesecake turned out great, so I really don't know how much of a difference it makes. 

Bake the cake at 325 for 1 hour 30 min. Then turn the oven off and open the door just a crack and let your cake cool in the oven for 30 more minutes. Once it has cooled, Remove the cake from the oven and refrigerate for at least a few hours, or overnight if possible!

Salted Caramel Sauce
  • 1 cup + 4 tsp. Sugar
  • 1/3 cup Water
  • 1/2 cup Salted Butter
  • 2/3 cup Heavy Whipping Cream
Let me just begin by saying that this stuff is money! You will probably have left overs after the cheesecake, so it would be awesome on ice cream, or marbled into brownie batter, or by the spoonful, or on asparagus...ok, maybe that is going a little far. But, you get the point!

So in a small-medium sized sauce pan over low heat combine the sugar and water and stir. Heat this over low heat until the sugar fully dissolves in the water. At this point add the butter. Melt it in and stir to mix it all together. Let it come to a boil and cook until it reaches a golden caramel color. You may have to turn the heat up to about a low-medium for this, but keep it pretty, low temperature still. Once the mixture is a nice caramel color, remove it from the heat and add in the cream. Whisk it to combine and put it back on the stove. Once more, let the mixture come to a boil over low heat and cook for an additional 10-15 minutes until it is at a good creamy consistency.

A couple things about the sauce (other than it's delicious-ness). The recipe says to cook until a golden caramel color. This will not happen quickly. It will need to cook off almost all of the water before it starts changing colors, and will get a little clumpy and not look like a sauce (this will fix when you add the cream, though). Take a book with you when you make this, I get nervous when making caramel and want to stir it every 2 seconds, but it will be fine, it won't boil over, and it's kind of hard to burn if you keep it on low heat, so don't hover over it waiting for it to turn colors like I did. It will likely take nearly an hour for the right color to happen (well worth the wait, though).

Once you add the cream, though you only need to cook for a bit longer to get the nice saucy texture. The spoon-test method works great for this. If you're not familiar with the spoon test, you dip a spoon into the sauce and pull it out. Run your finger down the back of the spoon with the sauce. If it runs back together over your finger mark, keep cooking it. If it stays on separate sides of your finger mark, it's done.

Pour it into a jar and refrigerate until you are ready to use it. When you're ready just microwave it or re-warm it on the stove!

Sunday, November 6, 2011

Pumpkin Cake with Spiced Apple Glaze


The easiest cake you will ever make, and it is dense and moist so it is the perfect last minute fall dessert!

Pumpkin Cake
1 box yellow cake mix
1 15 oz can of pumpkin

Using a hand mixer mix together the cake mix and the can of pumpkin. It will come together in a thick creamy batter. Pour the batter into a greased 9 inch square pan. Bake at 350 degrees for 28-35 min until toothpick comes out clean.

Apple Spiced Glaze
1 1/2 cups powdered sugar
3 Tbl Apple juice (or apple cider)
1/2 t. cinnamon
1/4 teaspoon ginger
1/8 teaspoon nutmeg
1/8 teaspoon ground cloves

Mix all of the glaze ingredients together pour over the cake while it is still warm. If you want it to be extra gooey and moist poke some toothpick holes all over the top before you cover it with the glaze. I like to pour a little bit over the whole thing and let it soak in before I add another layer of glaze and do the same thing again. Usually 3 times is enough, just making sure it is all covered and soaked in the spiced glaze!


Wednesday, November 2, 2011

The Best Turkey Burgers Around!


I have wanted to try to make turkey burgers for a long time. I have just been waiting to find a good recipe... the thing is, though, you never know if the recipe is good until you try it. I've always heard bad things about turkey burgers, like they dry out really easily, and they fall apart when you try to grill them. A couple of years ago all of those things came true when I tried to make chicken burgers. They fell apart, they didn't have enough fat to sear and brown nicely, and they were kinda dry. Safe to say, I only tried that once, and I hadn't been brave enough to try another poultry burger since.

SO, I recently found a friend who has a this turkey burger recipe, from her mom. She and a couple others vouched for the greatness of the recipe and I decided to give it a go.

Response: AWESOME! They are moist, juicy, flavorful (and even a little bit healthy)! Not to mention, easy and quick. They even exceeded my expectations and got a nice, pretty char on them from the grill (without falling apart)!

In sum, if you're looking for a good recipe for turkey burgers, or you've been too scared to try them out, this is the recipe for you.

Burgers:
19 oz ground turkey (I used 97% lean)
1/2 cup finely graded Gruyere cheese
4 thinly sliced scallions
1/4 cup dried bread crumbs
1/4 cup Dijon mustard
1 large clove garlic minced
Salt and Pepper to taste
Provolone cheese for melting on top of the burgers

Mix all the ingredients together and form patties. This recipe makes 5-6 burgers depending on the size.

Heat the grill to high and sear for 1-2 minutes on each side. Move to a cooler part of grill  (medium heat) and cook additional 4-5 min on each side. The last couple minutes on the grill melt the provolone over the top for those that want a cheesy turkey burger (highly recommended)!


Serve on a whole wheat bun with your desired toppings. Spicy mustard and BBQ sauce are both good options for condiments! Next time, I think I'll try basting  these burgers with a teriyaki glaze as I grill them, for an Asian flair. Let me know how it is, if you try it! 

Sunday, October 16, 2011

Girls Night Dessert!


I have wanted to make chocolate cups since I saw this post on bakerella, I just needed an event to make them for! So when we had a girls night dinner for Christmas, last year, I finally had the excuse I needed! I made two types of mousse to fill the cups with: peanut butter mousse and chocolate mousse. With a big group of girls, I think it's needless to say that they were a pretty big hit!

Chocolate Cup
Semi-sweet chocolate chips melted
Chocolate Almond Bark
Water balloons filled with air to the size you want your cups

Melt the chocolate mixture for dipping the balloons, blow up the balloons to the size you want, get a cookie sheet with parchment and put a little dollop of chocolate on the parchment paper for a base for the balloons to sit on. Dip the balloons in the chocolate and set it on the chocolate base. Let the chocolate cool.

 There will probably be thin spots from dipping where the chocolate layer is not even thickness. Take a basting brush or the back of a spoon and fill in the thin spots so that the bowl will be full thickness. If you try to pop the balloon with thin spots, the chocolate will tear instead of holding its shape.

When the chocolate has all hardened, pop the balloon and pull out the rubber from the shell! Voila, chocolate cups!

I used regular balloons, but since I only blew them up half way, when I popped them, they weren't super stretched out, so I had to pull the rubber out of the cup. I would recommend water balloons, they will be a bit more taught!

One awesome tip about dipping chocolate: whether it is strawberries or chocolate cups, I find that mixing half chocolate pieces and half chocolate almond bark (or even just 1/3 almond bark) keep the same taste while hardening harder and having a nice shiny coat when it cools!

Peanut Butter Mousse
1 cup cream cheese (softened)
2/3 cup smooth peanut butter
4 T sugar
3/4 c. whipping cream
(whip to soft peaks and fold in)

With an electric mixer blend together the cream cheese, peanut butter, and sugar. In a separate bowl whip the cream into soft peaks. Once soft peaks have formed, fold the whipped cream into the peanut butter mixture!

Chocolate Mousse
2 packages of instant chocolate pudding mix
4 cups half and half

Follow the directions on the back of the pudding box for the amount of cream and pudding, using the half and half instead of milk. Now stop following the directions and use mine. Using electric mixer, beat together the pudding mix and half and half about 5 minutes until mousse forms. This is the absolute easiest chocolate mousse ever, but it is thick and rich! It's even thicker and creamier if you use cream instead of half and half... but that seemed just a little too indulgent for me with everything else we were eating at this particular girls night.

Once all the components are finished, layer the two mousse types into the chocolate cups and garnish with chocolate shards or curls! Pretty and delicious!

If anyone else tries this let me know how it turns out, for you!

Sunday, October 9, 2011

Almost Mama's Chili


In past posts I may have made my mom seem like the worst cook on the planet... this, in reality, may have been a creative hyperbole. It's just a running joke in my family because my dad does most of the cooking. My mom does the baking.

My dad is a great cook... he taught me everything i know (almost), but he once tried to broil a cake for my mom... obviously NOT the baker of the family!

My mom, on the other hand, is great at baking. She makes a mean chocolate sheet cake, amazing almond poppy-seed bread, and so many others, but she is lacking in the creativity and guess work that my dad has in the cooking area. HOWEVER, there are about 3 or 4 things that my mom cooks extremely well, and she could do it with her eyes closed! One of these few things is her Chili! YUUUUUMMMM, Chili!

I grew up eating this chili at least a couple times a year in the winter, and it was always one of my favorites! So, naturally, when I moved out, I missed it and had to learn to make it on my own. The recipe changed a bit when moving hands from mother to daughter, but either recipe is great, comforting, and filling... a pot of it would feed me in college for about a week!

Enough of this though... here's the recipe:

What you'll need:
15 oz Brooks Chili Hot Beans
3 (8 oz) cans of tomato sauce
1.5-2 lb ground beef
1 medium white onion finely chopped
6-8 cloves garlic, minced
2-4 Tbl. chili powder
1-2 Tbl. Sugar
Paprika (1/2 Tbl.)
Cumin (2 tsp.)
Nutmeg (1 tsp.)
Cracked Black Pepper (to taste)
1-2 tsp. Salt (to taste)
Cayenne pepper for extra spicy-ness! (add slowly, to your specific heat preference)

Brown the ground beef, chopped onion, and garlic together in a pan. Once Onion and garlic are soft add 1 Tbl. of the chili powder to the meat mixture and season with salt and pepper. Continue cooking until browned.

In a big pot mix together the beans, tomato sauce, and a little water from rinsing each can. Simmer and mix together. When beef mixture is finished, stir it in.

Now comes the fun part: My mom's recipe is simple; it calls for salt, pepper, sugar, and chili powder...that's all! Simple right!

BUT I couldn't leave it that simple, I like to add a few more things! Definitely add in those ingredients (I use less sugar than my mom, though.)  In addition to my mom's recipe, I like to add a few more things... paprika, cayenne, nutmeg, and cumin.

How much of each? Well that's the subjective part... you get to decide that for yourself, I don't usually measure. Just sprinkle... taste... smell... repeat. If that scares you to death, I put some suggestions above in parenthesis. Keep in mind these are very rough estimates because I don't actually measure... ever.

Overall this recipe is extremely easy, fairly quick, and absolutely delicious! Everyone has their favorite way to eat chili and here are some of the best ways for this recipe:
  • My favorite: with Frito's and sharp cheddar cheese mixed in! Mmmm, Frito Pie!
  • My Dad's: Leftover chili over spaghetti noodles, chili-mac style
  • My boyfriend Ben: with a dollop of sour cream and LOTS of cheese
  • My sister's: with lots of Frito's and all the beans picked off to the side :)

Doesn't really matter, just find your favorite way, and enjoy on a cool fall or winter day!


Sunday, May 9, 2010

How To: Cook For One (or Two)


As a student, or single person, it is difficult to cook for just one or two people... I learned to cook mostly from my father and it was always cooking for an entire family so I had to learn "cooking for 1" the hard way... trial and error. For a really long time I made WAY WAY WAY too much food. It has taken me nearly 4 years... but now that I'm graduating college I pretty much have it down! Warning: it takes some getting used to.

This is actually another big reason I don't use recipes very often: recipes always make 4-6 servings... splitting a recipe in sixths is not practical... nor is it practical for me to eat the same dish for 4 days straight until I hate everything about it.. A lot of times I will get ideas from recipes and then estimate at amounts or improvise based on the ingredients I have available. So, in hopes of helping some others catch on more quickly, I have compiled a list of a few things I have found to be very helpful tricks.

Cooking for One 101:


1. Plastic baggies and cling wrap will save your life!

When you buy meat at the grocery store (chicken, sausage, hamburger), while it is still thawed individually wrap it up and freeze it in single portions. Chicken is easy: one breast per bag. You can freeze multiple breasts per bag, just make sure they don't touch each other so you can break out of freezer more easily, instead of them freezing in one big lump. For sausage or hamburger, portion out 1/4 or 1/5 of the meat into balls and freeze. The sausage balls are easier to do with cellophane or press and seal wrap... you can wrap them individually with cling wrap and the press and seal can wrap a bunch of them in one sheet and just seal off individually in between (just press... to seal)! This makes meat for pasta or burgers so much easier to use when you don't have to thaw a giant 2 pound block of meat!


2. When in doubt, BUY LESS

Don't buy too much at once...it will go bad... I promise. You may be thinking, "But I cook every night, I will use 3 peppers, 2 onions, a head of lettuce, and 1 bunch of asparagus.: But let me tell you, NO YOU WONT!!!

Ok, yes, you might have to make a second trip to the grocery store at first, while you are getting used to how much to buy, or for something more specific, but that is better than wasting food by letting all of your produce rot in your refrigerator! Not to mention, since produce is probably the most expensive thing on my grocery list, rotting produce is not good for the student budget!

On the same note... don't be afraid to freeze produce (especially vegetables). If you buy a bundle of asparagus and know you wont eat the whole thing in one week (before it starts getting soggy), freeze half of it (or 2/3) and thaw it out as you need it. Veggies freeze and thaw well! It will still taste fresh!

You can cut peppers and onions into strips for stir fry and throw them straight in the pan, frozen they thaw evenly and quickly! See #1... plastic baggies will save your life; although, I will recommend (for the environment's sake) that you use Tupperware some of the time, or re-use the baggies for more frozen vegetables!


3. Know what you should not freeze

Freezing can be a great thing... some things just don't freeze well, though. They wilt and lose flavor, get soggy, etc. Things with thin leaves, like most lettuce, will wilt easily after freezing because of ice forming in their leaves...same thing goes for Brussels sprouts. Buy them fresh and don't freeze them.

If you're going to freeze fresh herbs layer them in between dry paper towels and then seal them inside a plastic baggie (again... RULE #1) to keep as much moisture out as possible and prevent ice crystals and wilting!


4. The rules of Onion and Garlic


I love onion and garlic... I put them in pretty much everything that I make. Neither of them go bad too quickly, which is nice, but at the same time you don't need 5 onions lying around for one person. Also, you don't use near as much onion in a single dish as you would for multiple servings.

My general rule is one onion can last a whole week (sometimes longer). Garlic, keep it in the refrigerator it will last longer there, but don't buy more than 2 heads of garlic at a time. 1-2 cloves is plenty of garlic for any 1 person dish. See rule #1 for how to store partially used, previously cut onion.

Ginger root: I'll add this here, because I don't know where else to put it. I cook a lot of Asian dishes, and lots of those use fresh ginger. Ginger root, though is a strong flavor, and you can't use a lot of it quickly. The best way I've found to deal with this is to peel the ginger root while it is fresh from the store. Then freeze it (see rule #1 again). you can take it out of the freezer anytime you want and grate off however much you want, then pop it back in the freezer.


5. Keep a well stocked Spice Cabinet/ Pantry

BARE MINIMUM: salt, black pepper, red pepper flake, garlic powder, onion powder, Italian seasoning, cinnamon, olive oil, vinegar (balsamic, white whine, cider), vegetable oil, flour sugar, eggs, milk, butter, vanilla, rice, noodles


HIGHLY SUGGESTED: chili powder, blackening seasoning, poultry seasoning, ground ginger, cumin, chocolate chips, basil, rosemary, thyme, oregano, bay leaf, 5 spice blend (Asian), paprika, cayenne pepper, nutmeg, soy sauce, sesame oil, rice whine vinegar, Worcestershire sauce, lemons/ lemon juice, Parmesan cheese


6. Don't be afraid to improvise!


This rule is the most important rule (Even more important than #1). Use what you have and get creative! Use the same ingredients in different ways. Even if you only have a fourth of a bell pepper left: bell peppers-Asian stir fry, stuff them, Italian style pasta, soups, sauces, pizza, sandwiches, pita, etc. The list is never ending!

Thursday, May 6, 2010

Seared Tuna Steak


SOOOO simple... one of my favorite easy dishes. The only difficult thing can be finding fresh tuna steak at a grocery sore in the mid-west. When I find it, I always buy some!

What you'll need:
2 cloves garlic, chopped
red pepper flake
soy sauce
sesame oil
shallot (or onion)
ginger (ground or freshly minced)
olive oil
black pepper

All you do: Make just enough of the marinade to cover the tuna steak. Marinate the tuna in this mixture for about an hour (30 min would be fine). Heat up a skillet (or grill) to high heat and sear on each side for about 2-3 minutes. Watch it closely and don't overcook it. You still want it to be rare in the middle... at least I do! I usually blanch some edemame and light salt it for a side dish! Fresh, light, and irresistible in my book!

Friday, April 23, 2010

Brussels Sprouts


I recently discovered that Brussels sprouts are nothing like the stereotypical disgusting vegetable! I would rather eat these than broccoli any day. That, in itself, doesn't say much because I hate broccoli. However, I should make a better statement about them, because I actually really enjoy Brussels Sprouts, especially when they are cooked well and topped with a little grated Parmesan cheese! They are also super fast, easy to make...and really difficult to screw up.

All you do:
  • Cut off the hard white ends of the Brussels sprouts
  • Boil and salt a pot of water
  • Blanch the Brussels sprouts for 5-6 minutes (until tender)
  • Saute some sliced shallot and garlic in a little butter and olive oil
  • Toss in the Brussels sprouts and saute for a few more minutes
  • Season with salt and pepper to taste
  • Top w/ freshly grated Parmesan cheese if you want (I am a firm believer that everything is better when topped with a little bit of cheese)
Don't be scared off by June Cleaver's version... even though Beaver makes it seem that Brussels sprouts are the grossest vegetable out there... I promise they are actually really good!

Sunday, March 28, 2010

Tilapia in a Pouch


I have been eating a lot of fish lately. Its tasty, good for you, quick...what else can a college student ask for (other than cheap)! Anyway, I usually just season the fish however I want it and then cook it in a skillet on the stove for a few minutes each side. Last time I wanted to try and bake it! The whole oven seemed like a waste for one tiny piece of fish, so I baked it in my little toaster oven...it turned out great!

What You'll Need:
  • Tilapia filet
  • olive oil to drizzle
  • salt/pepper
  • garlic
  • onion
  • mushrooms
  • red peppers
  • lemon slices
Now, this is just the way that I did it... you can use any combination of spices and vegetables you want in this. You could do it Asian style with some water chestnuts, soy sauce, bamboo chutes, and bok choy... Mexican style with tomatoes, peppers, onion, jalapeƱo, and taco seasoning... Italian style with fresh basil and lemon etc... really, the possibilities are endless.

All you have to do is sliver up the vegetables, chop your garlic, slice your lemon, season your fish, wrap it up in a foil pouch, and bake it at 375 degrees for 30-40 minutes until the fish is flaky. The worst part about baked fish is usually the tendency to dry it out. When it is wrapped up in the pouch though, it holds in the steam and the fish is pretty hard to overcook.

Saturday, March 20, 2010

Bleu Macaroni and Cheese


I first made this dish for Thanksgiving dinner 2 years ago. It was a minor disaster (equivalent to a small California earthquake)! I don't mean the flavors were a disaster, they were great, it was more of the proportions that were "off," to say the least.
Long story short: the recipe I followed said to use 2 cups of macaroni to serve 2 people. I quadrupled the recipe in order to serve it as a side dish at my big family Thanksgiving dinner. Does anyone know how much 8 cups of macaroni is once you cook it? It's probably enough to feed the entire population of Wyoming for about a week...

Needless to say that we had WAY to many noodles, not enough sauce, and nowhere to put it! However, I didn't realize the noodle sauce ratio would be off until after I mixed it all together and filled up 6 casserole dishes with the macaroni.

Conclusion: Flavor= fantastic; Proportions = disagreeable

ANYWAY: we figured that the recipe must have meant 2 cups cooked macaroni, not 2 cups uncooked macaroni... either way I still think that would have been too many noodles... I have fiddled with the proportions and come up with this: a good noodle sauce ratio that makes ONE casserole dish of gourmet macaroni and cheese.

What you'll need:
2 3/4 cups elbow macaroni (uncooked)
3 cups whole milk
8 oz. Gruyere cheese
6 oz. Sharp White Cheddar
4 oz. Bleu cheese (I love a great Roquefort)
pinch of nutmeg
4 Tbl. butter
4 Tb. flour
salt and pepper to taste
breadcrumbs and dried basil for topping

Warm the milk in a sauce pan over medium heat. In the meantime use the butter and flour to make a roux (melt butter and sprinkle in flour and cook for a few minutes until lump free and doesn't smell like flour any more--should be golden colored). When milk is simmering, add the roux and thicken to a saucy texture. Add in the pepper and nutmeg for flavor (don't add salt until after you've added cheese... you probably won't need any).

When the sauce has thickened, remove it from the heat and stir in the monstrous pile of cheese that you've convinced your family to grate up. Stir in until incorporated and smooth. Pour the sauce over cooked noodles in a baking dish. Sprinkle the breadcrumbs and basil over the top before baking.

Bake for 30-45 min at 400 degrees or until the cheeses are bubbling and the top is crispy and browned. It wont need the full 45 minutes unless you refrigerate it overnight before cooking...could be done as soon as 20 min. Just watch for bubbly cheese!

Monday, March 15, 2010

How To: Spruce up Sauce from a Jar


Welcome to the first of (hopefully) many in the " How To" series! This firs t one is just an easy way to spruce up any pasta sauce from a jar. You don't have to make homemade sauce if you want great flavor, but you also don't have to settle for just the typical jar sauce either.

Here's what I like to do:

  • Saute a few cloves of garlic and some sliced onions in olive oil
  • Slice up Italian sausage and throw in with onions (ground sausage fine too... whatever you have)
  • Pour in jar of sauce (vodka sauce is what I had... anything you like will do)
  • Add a few tablespoons of balsamic vinegar or a full flavored wine if you like-reduce the sauce to your liking
  • Add in some chopped fresh basil or parsley. Wilt the herbs as you stir them in and add some freshly graded Parmesan Cheese
  • Pour over your favorite noodle (whole wheat penne) and enjoy!

Wednesday, March 3, 2010

Spicy Asparagus Pasta


"Asparagus made into a pasta sauce...interesting..." That's what I thought too. Honestly, the first go round was "interesting" at best.

The original recipe I found used asparagus, but also called for A LOT of parsley in the sauce. Don't get me wrong, I like a little parsley here and there to lighten up a dish. However, I think my sister said it best when she pointed out that the first attempt tasted quite similar to grass.

I still liked the idea of the asparagus pasta sauce, though so I have fiddled around with this dish a few different times and the current (parsley free) version is by far one of my favorite vegetarian dishes.

What You'll Need:
Asparagus (estimate-depends on how much you're making, I used about a half a bundle)
3 cloves garlic (obviously increase if you make more)
Olive Oil
Salt and Pepper
Red Pepper Flake
Parmesan Cheese
Whole Wheat Spaghetti

Cut the asparagus into 1 inch pieces and blanch in boiling water for about 5 min. Ice it immediately to stop the cooking, blend up with garlic, olive oil, red pepper flake, and salt pepper. The seasonings are all just to taste. I love spicy food so I like to use about a teaspoon of red pepper flake to give it some heat! Use as much olive oil as you need to get to the consistency you want... probably a couple of tablespoons will do.

The end product is sort of like an asparagus pesto, mix over whole wheat noodles with freshly graded Parmesan. Genius...quite a change from its grassy beginning